An automated content engine can cut the time spent preparing articles, social posts, and marketing materials. The safest approach is to automate drafting and administration while keeping a human responsible for accuracy and publication.
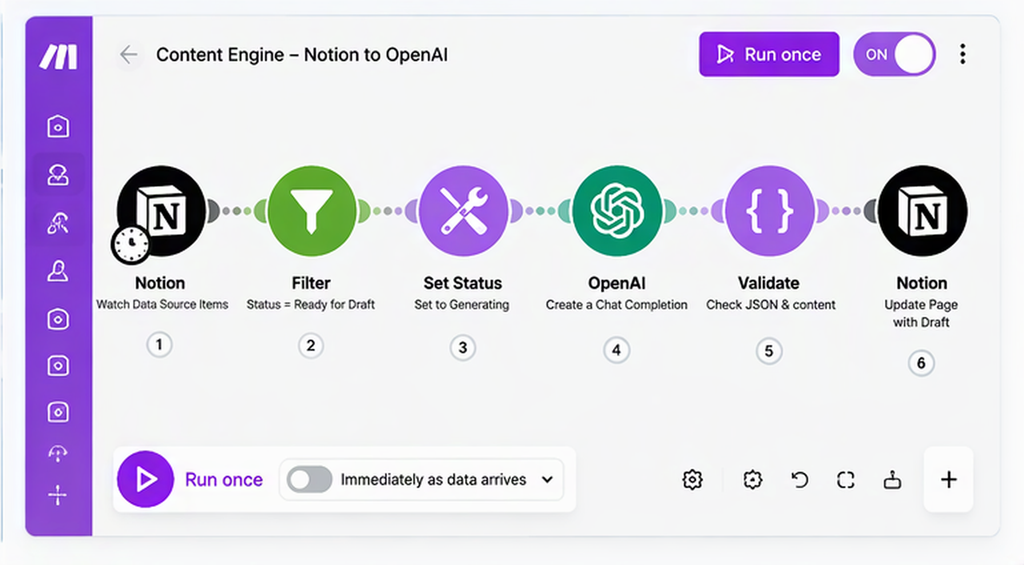
This guide explains how to connect Make.com, the OpenAI API and Notion into a practical content workflow.
Quick Verdict
For most solo founders and small technical teams, the best setup is:
- Make.com to control the workflow
- OpenAI API to generate and transform content
- Notion to manage briefs, drafts and approvals
Choose Make.com if: You want to build quickly without maintaining a custom application.
Choose a custom OpenAI integration if: You need source control, automated testing, complex logic or high-volume processing.
Use Notion with either option if: You need a clear editorial queue and human approval process.
Who is this actually for? This setup suits software engineers, IT managers and solo founders producing repeatable content such as technical guides, product comparisons, knowledge articles and social posts. It is less suitable for investigative, legal, medical or highly specialised content where expert judgement is essential.
Make.com, OpenAI and Notion Compared
| Tool | Main role | Starting cost | Best for |
| Make.com | Workflow automation | Free plan available | Connecting systems and managing workflow stages |
| OpenAI API | Content generation | Usage-based | Drafting, classifying and restructuring content |
| Notion | Editorial workspace | Free plan available | Briefs, approvals and content tracking |
| Custom application | Full workflow control | Development cost | Complex or high-volume operations |
A ChatGPT subscription does not include general OpenAI API usage. API calls are billed separately according to the selected model and the number of tokens processed.
Make.com: Where It Fits
What it is
Make.com is a visual automation platform. It connects applications using triggers, actions, filters and routing rules.
In this workflow, Make watches Notion for approved briefs, sends them to OpenAI and writes the generated draft back to Notion.
Pros
- Quick to deploy: You can build a working prototype without creating a custom application.
- Easy to troubleshoot: You can inspect the information passed between each step.
- Flexible routing: Different content types can use different prompts and approval paths.
Cons
- Costs can grow with activity: Each module action consumes credits, including repeated actions and retries.
- Complex scenarios become difficult to manage: Large workflows need documentation, testing and change control.
Best IT use case
A content team changes a Notion record from Idea to Ready for Draft.
Make detects the change, sends the brief to OpenAI and creates a draft. The record then moves to Human Review, where an editor verifies facts, links and recommendations.
OpenAI API: Where It Fits
What it is
The OpenAI API gives applications controlled access to language models.
It can generate articles, classify briefs, create summaries and return structured data for Make to process.
Pros
- Structured output: Content can be returned as predictable JSON rather than an unstructured block of text.
- Flexible model selection: Lower-cost models can handle simple tasks while stronger models are reserved for detailed analysis.
- Consistent instructions: Brand voice, required structure and prohibited language can be maintained centrally.
Cons
- Accuracy is not guaranteed: AI-generated prices, features, links and citations must be checked.
- Costs vary: Long prompts, large outputs and repeated retries increase token usage.
Best IT use case
An engineering team supplies the API with an approved brief, verified source material and a defined output format.
The response is checked for missing sections, unsupported claims and formatting errors before entering the editorial queue.
Real-World Workflow Implementation
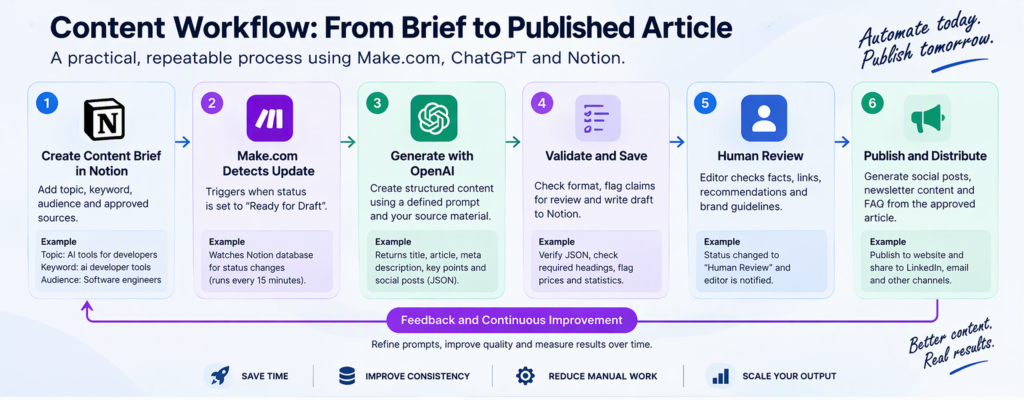
The following process automates content preparation without allowing AI to publish unchecked material.
Step 1: Create a Notion content database
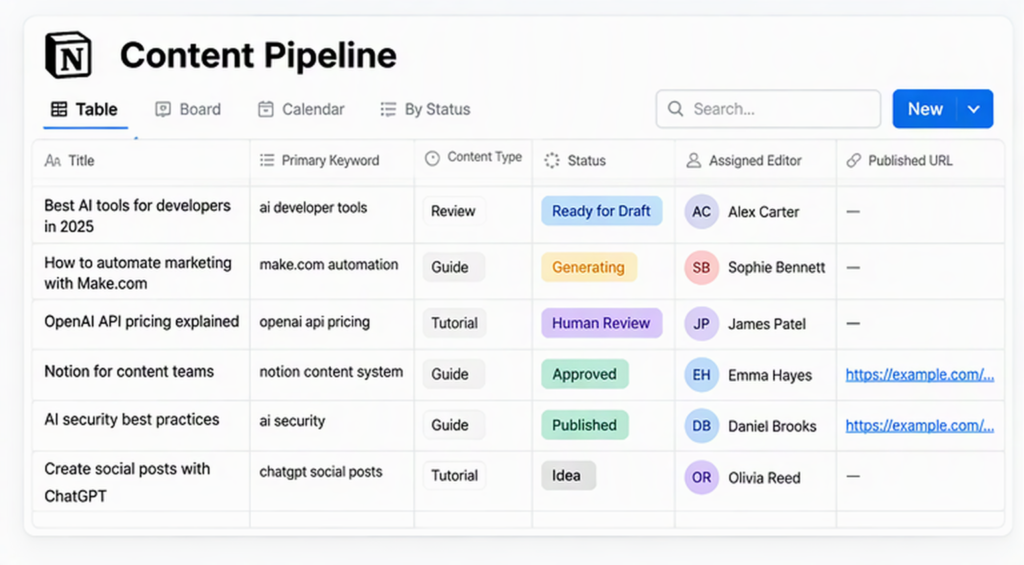
Create a database called Content Pipeline with the following fields:
| Field | Purpose |
| Title | Working article title |
| Primary Keyword | Main SEO keyword |
| Audience | Intended reader |
| Content Type | Guide, review, tutorial or comparison |
| Brief | Required outcome and key points |
| Approved Sources | Source material the article may use |
| Status | Workflow stage |
| Assigned Editor | Person responsible for review |
| Prompt Version | Instruction version used |
| Last Error | Troubleshooting information |
| Published URL | Link to the completed article |
Use these status values:
- Idea
- Ready for Draft
- Generating
- Human Review
- Approved
- Published
- Failed
Step 2: Create the Make.com trigger
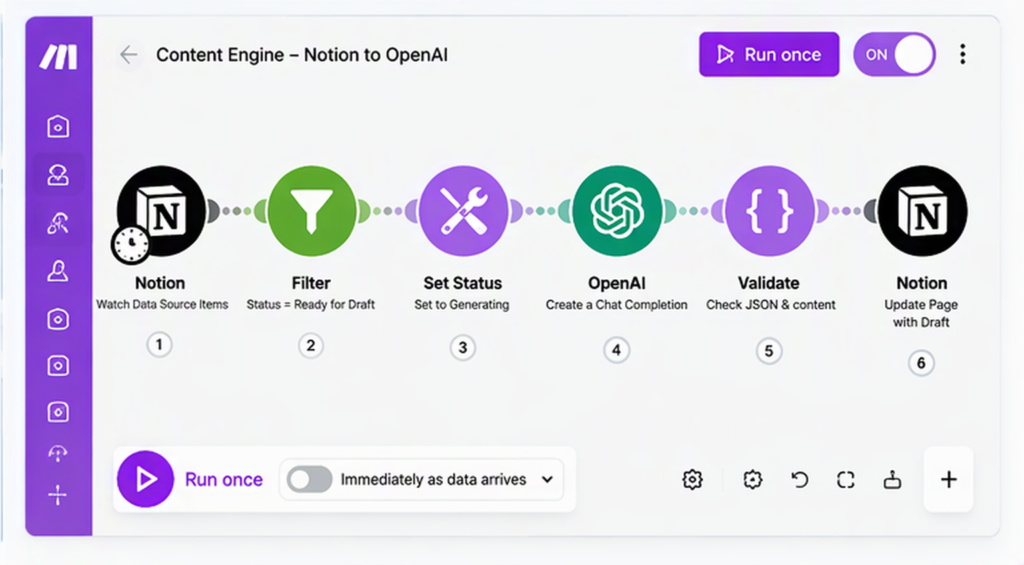
Create a Make scenario using the Notion Watch Data Source Items module.
Add a filter so that only records where Status = Ready for Draft continue through the workflow.
For most content teams, running the scenario every 15 minutes is sufficient. Running it every minute adds cost and activity without delivering much additional value.
Step 3: Prevent duplicate processing
As soon as Make picks up the record, change its status to Generating.
You should also store a run ID or processing timestamp. This reduces the risk of two scenario runs producing duplicate drafts.
Step 4: Build the prompt
Divide the prompt into four sections:
- Editorial instructions
- Article brief
- Approved source material
- Required output format
Use structured output such as:
{
“title”: “”,
“meta_description”: “”,
“article_markdown”: “”,
“key_recommendation”: “”,
“claims_requiring_review”: [],
“social_posts”: []
}
The claims_requiring_review field should identify prices, dates, statistics and product claims that need checking.
Step 5: Send the brief to OpenAI
Use Make’s OpenAI module to generate the response.
Configure:
- Selected model
- Maximum output length
- Structured response format
- Timeout period
- Maximum retry count
- Error-handling route
Store the API key in Make’s connection settings. Do not place credentials in prompts, Notion fields or manually constructed URLs.
Step 6: Validate the response
Before saving the draft, check that:
- The response uses valid JSON.
- The article title and body are present.
- Required headings exist.
- The primary keyword is included naturally.
- The response stays within the expected length.
- Prices and factual claims are flagged.
- Prohibited promotional language is absent.
Retry a failed response once. If the second attempt fails, set the Notion status to Failed and record the error.
Avoid unlimited retry loops because they can generate unexpected Make and OpenAI costs.
Step 7: Write the draft to Notion
Create or update the Notion page with:
- Generated article
- Meta description
- Claims requiring review
- Suggested social posts
- Model name
- Prompt version
- Generation timestamp
Change the status to Human Review and notify the assigned editor.
Step 8: Complete human review
The editor should check:
- Product pricing
- Features and technical limitations
- Links and citations
- Security or privacy claims
- Affiliate disclosures
- Recommendations and comparisons
- Potentially duplicated content
AI should prepare the draft. A named person should remain accountable for publication.
Step 9: Generate additional content
Once the article is approved, a second Make scenario can generate:
- LinkedIn posts
- Newsletter summaries
- FAQ content
- Meta descriptions
- Internal-link suggestions
- Image briefs
Generate these assets from the approved article, not the original AI draft. This prevents different channels from publishing conflicting information.
💡 Must-Do Automation Tip: Save hours building custom workflows. Get the pre-built templates and production-ready prompts in the AI Automation & Prompt Library for £29.[VIEW THE £29 AI AUTOMATION & PROMPT LIBRARY]
Pricing and Value for Money
Make.com
Make.com offers a free plan for testing and paid plans for higher automation volumes.
The real cost depends on the number of actions in each workflow. A scenario containing ten modules may consume approximately ten credits per article before retries, loops or follow-on workflows.
Watch for:
- Frequent polling
- Unnecessary modules
- Repeated API calls
- Iterator loops
- Failed runs
- Duplicate scenarios
OpenAI API
OpenAI API usage is billed according to the selected model and token consumption.
Use this calculation:
Monthly API cost =
(input tokens ÷ 1,000,000 × input price)
+
(output tokens ÷ 1,000,000 × output price)
Control costs by:
- Using smaller models for classification and metadata
- Reserving stronger models for complex writing
- Limiting output length
- Reusing stable instructions
- Preventing unnecessary retries
- Monitoring usage and setting budget alerts
Notion
Notion’s free plan is often sufficient for a solo prototype.
Paid plans become relevant when you need additional collaboration, security, workspace management or permission controls. Remember that Notion pricing is generally based on workspace members, not the number of automated articles.
Realistic starting budget
A solo founder can begin with:
- Make.com: Free or entry-level paid plan
- Notion: Free or Plus
- OpenAI API: Usage-based
- AI Automation & Prompt Library: £29 one-off
- Editorial review: Internal time
The software is usually the smaller part of the total cost. Source collection, fact-checking and editorial review remain the main operational commitments.
Essential Security Controls
Before moving into production:
- Use separate development and production scenarios.
- Restrict Make editing rights.
- Store API keys in managed connections.
- Give the Notion integration minimum required access.
- Avoid sending confidential information to the model.
- Record the model and prompt version used.
- Configure spending alerts.
- Require human approval before publication.
- Test timeouts, failures and duplicate processing.
- Maintain a manual fallback process.
Larger organisations should also review data retention, supplier terms, international data transfers and the handling of personal or commercially sensitive information.
Final Verdict
For most solo founders and small teams, Make.com, the OpenAI API and Notion provide the right balance of speed, cost and control.
Start with one content type and one approval process:
- Build the Notion editorial database.
- Create one Make.com drafting scenario.
- Require structured OpenAI output.
- Keep human approval mandatory.
- Test the workflow across 20 articles.
- Measure editing time, errors and cost per approved article.
Move to a custom application when scenario complexity, security requirements or publishing volume make visual automation difficult to maintain.
The objective is not to generate the maximum number of articles. It is to produce accurate, useful content with less repetitive effort.
—
Build Your Automated Content Engine
Use Make.com to connect your systems, OpenAI to prepare content and Notion to keep the process controlled.
[TRY MAKE.COM: INSERT AFFILIATE LINK HERE]
For ready-to-use workflows and prompts, explore the i-mustdo resource hub and get the AI Automation & Prompt Library for £29.